Guide To Creating A GTM Account
- TJ Aldrich-Shadle
- Aug 30, 2024
- 2 min read
Creating a GTM Account
Below is a guide to creating a Google Tag Manager account and a client-side container. You can use a GTM account for numerous website tracking integrations with minimal coding.
Prerequisites
Google Account:
You need to have a Google Account to create a Google Tag Manager account. If you don't have one, you can create a Google Account by visiting the Google Account creation page.
Website:
You should have a website where you want to implement and manage tags using Google Tag Manager.
Access to the Website's Code or Mobile App Development Environment:
You need access to the source code of your website to add the Google Tag Manager container code.
Steps To Creating Google Tag Manager Account
Visit The Google Tag Manager Website:
Go to the Google Tag Manager website.
Sign In:
If you are not already, sign in with your Google Account credentials.

Make sure that you are logged into the proper Google Account. For example, I have two different Google Accounts. I want to ensure that I am logged into the proper one.

After signing in, you may need to find your way back to Google Tag Manager. Here is a link to take you there. Google Tag Manager website
Create An Account:
Once signed in to your Google Account, make sure you the Google Tag Manager website and click on the "Create Account" button.

Enter Account Details:
Fill in the account details, starting with Account Name and Container Name. You can fill these out any way that you want to.
Next, select your target platform. In this case, I selected “Web”.
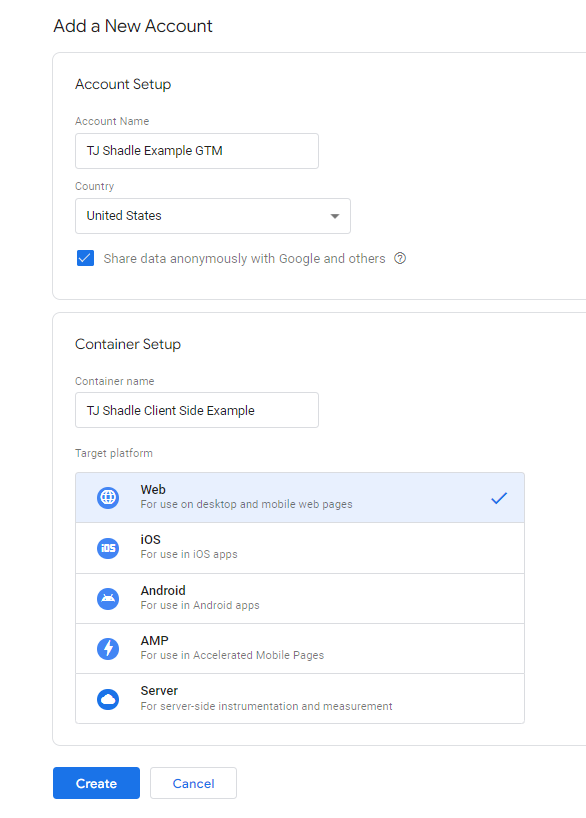
Lastly, click the “Create” button.
Accept Terms Of Service:
Review and accept the terms of service.
Install The Google Tag Manager Code On Your Website:
Follow the instructions to add the generated container code to your website. The instructions from Google Tag Manager should look like the image below.

Start by inserting the GTM code within the <head> of your website.
For WordPress websites, this <head> code should be found within the website’s theme. Make sure that you have selected your current website theme before inserting the code.
After inserting the code in the head, you will then insert the additional GTM code in the <body> of your website. The <body> code should be found directly below the <head> code.
The below image shows the steps to insert GTM codes on a WordPress website.

Place your website URL in the “Test your website” box offered by Google Tag Manager. If you installed your code correctly, you should receive a green checkmark.

Lastly, click “OK”.
All Done!
Your new GTM account should look something like this.

You can now start tracking events with Google Tag Manager.
Commentaires